
pOrtahl - Zenmaster Sizing Instructions
Zenmaster Bracelet Sizing Guide
How to Add or Remove Links for the Perfect Fit
Before you start, grab the following tools:
- 2 identical screwdrivers (included in your Zenmaster box)
- A ruler or flexible measuring tape (or paper + scissors if you don’t have one)
- Sit down at a table and make sure it’s uncluttered so you don’t easily lose a screw
Some things to keep in mind while you work.
- Always use both screwdrivers, one to hold the pin in place, one to turn the screw.
- You may want to work over a soft surface so parts don’t roll away.
- If a screw doesn’t budge, don’t force it. Check alignment and retry gently. Some screws may be tighter than others, so move on to another screw if you don't feel confident that the screw will give way.
- Note that there are extra screws, extra links and extra half links in your Zenmaster box. Store them safely in case you might need them at some point.
Your Zenmaster is made to last, so take your time setting it up right the first time. This is an easy process, even if you have never done this before! Just follow the instructions.
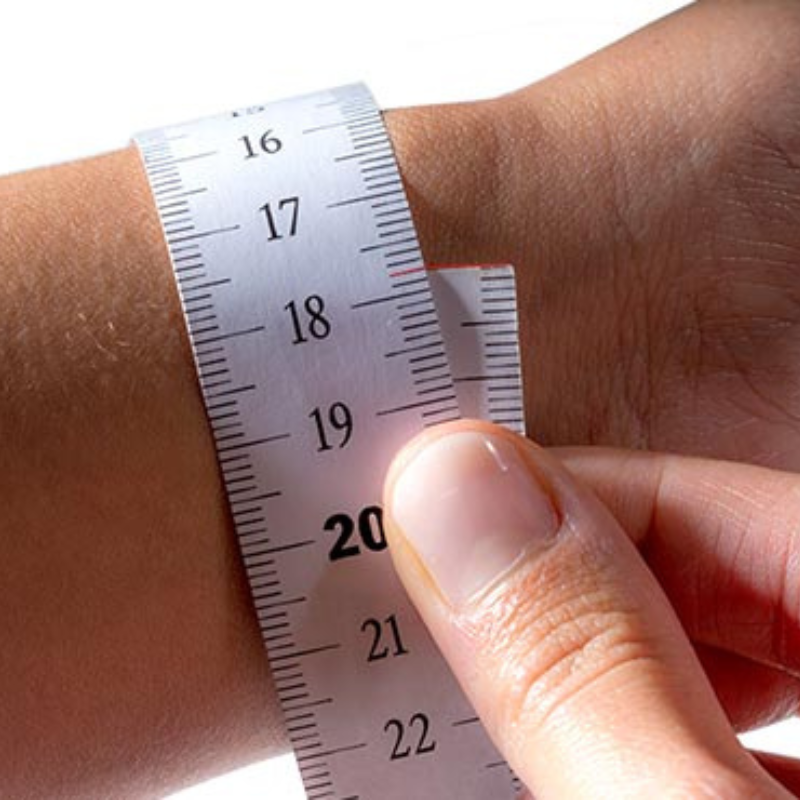
Step 1. Measure your wrist
To find your perfect fit, start by measuring your wrist just above the wrist bone. It should fit snug but not tight.
Option A: Use a measuring tape
Wrap the tape around your wrist and read the number where it overlaps.
Option B: Without a measuring tape
- Cut a thin strip of paper.
- Wrap it around your wrist and mark where the paper meets.
- Lay the strip flat and measure the distance from the end to your mark using a ruler.
That distance is your wrist circumference.
Step 2. Check the sizing table
Refer to the sizing table below to determine the total number of links (including the link attached to the clasp and the link with the quick-release spring bar) required on each side of the bracelet (top at 12 o’clock and bottom at 6 o’clock) based on your wrist measurement.
👉 Important: The Zenmaster bracelet is identical on both sides of the clasp.
If you end up with an uneven number of links, reattach the side with fewer links to the bottom of the case (6 o’clock position).
| Wrist size (cm) | Wrist size (inch) | Top bracelet links | Bottom bracelet links |
|---|---|---|---|
| 14.0 | 5.5 | 8 | 8 |
| 14.5 | 5.7 | 8 | 8 |
| 15.0 | 5.9 | 9 | 8 |
| 15.5 | 6.1 | 9 | 8 |
| 16.0 | 6.3 | 9 | 9 |
| 16.5 | 6.5 | 10 | 9 |
| 17.0 | 6.7 | 10 | 9 |
| 17.5 | 6.9 | 10 | 10 |
| 18.0 | 7.1 | 10 | 10 |
| 18.5 | 7.3 | 11 | 10 |
| 19.0 | 7.5 | 11 | 10 |
| 19.5 | 7.7 | 11 | 11 |
| 20.0 | 7.9 | 12 | 11 |
| 20.5 | 8.1 | 12 | 11 |
| 21.0 | 8.3 | 12 | 12 |
| 21.5 | 8.5 | 12 | 12 |
| 22.0 | 8.7 | 13 | 12 |
| 22.5 | 8.9 | 13 | 12 |
This is an example for a 15.5cm/6.1 inch wrist. With 8 bottom (6 o’clock) links and 9 top (12 o’clock) links:

Step 3. Prepare the Bracelet
Make sure the bracelet isn’t attached to the case while you work to avoid any accidents. Lay the bracelet out on a flat surface.

Step 4. Detach the bracelet from the clasp
Each bracelet side is attached to the clasp with a screw pin.
Here’s how to remove it properly:
- Insert one screwdriver into each side of the bracelet link attached to the clasp (there’s a screw hole on both ends).
- Hold one screwdriver steady to keep the pin in place.
- Use the other screwdriver to gently turn the opposite screw counterclockwise until it loosens.
- Slide the screw pin out carefully.
- If you’re removing more than one link it’s best to remove the clasp from both sides of the bracelet.
💡 Tip 1: Keep all tiny screws and pins in a small tray or on a piece of tape to avoid losing them.
💡 Tip 2: You can remove any link from the removable links (links with an arrow), so it doesn't necessarily have to be the link attached to the clasp. If you feel that screw is wound too tight and you have trouble loosening it, don't force it, more on to another link to detach it there.


Step 5. Add/Remove the links
Now add or remove the number of links based on your wrist measurement. Check the table one more time to make sure!
In case of an even number, make sure to remove an equal amount of links from each side of the bracelet.

Step 6. Reattach the Clasp
Once you’ve removed the desired amount links:
- Align the end of the bracelet with the clasp.
- Insert the screw pin through the holes.
- Use both screwdrivers again, one to hold the pin, one to tighten the screw clockwise until snug.
-
Don’t overtighten! Just make sure it feels firm and secure.

Step 7. Reattach the Bracelet to the Case
Use the quick-release buttons to reconnect both bracelet ends to the case.

If you have removed an uneven number of links, then make sure to attach the side with fewer links to the bottom of the case (side of the 6 o’clock position) for a slightly better fit.
Make sure that when you reattach the bracelet the quick-release pins pop back out and into the lug holes! It's best to gently pull on the bracelet after reattaching it to check if the bracelet is secured in the lug holes.
You're all zen!
Try the watch on and wear it for a few minutes. Only you know what the perfect fit feels like. If your bracelet feels:
- Too loose: Remove an extra link and keep in mind that you have the option of adding half links to the bracelet which were included in the box.
-
Too tight: You have the option to add one half link (included in the box):
- to the top (12 o’clock) if you have an even number of links;
- or to the bottom (6 o’clock) if you have an odd number.
Enjoy your new Zenmaster watch!